

Ihr Lieben!
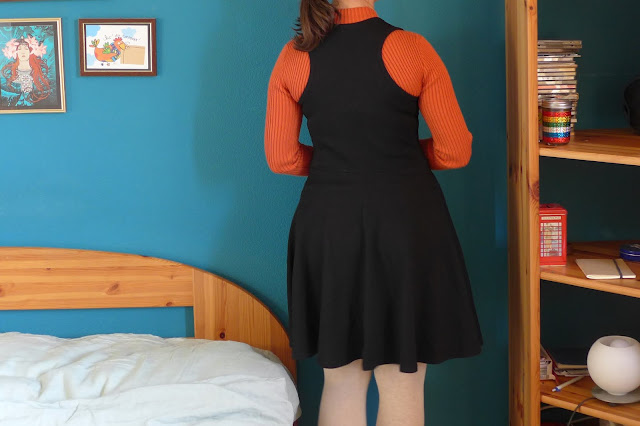
Ich hoffe, ihr seid gut durch den Winter gekommen. Obwohl, ganz vorbei ist der ja noch nicht. Deshalb habe ich mir ein Kleid aus dickem Jersey genäht, das ich gut mit Rollkragenpullis kombinieren kann. Das Schnittmuster habe ich mir von Kleidungsstücken abgeguckt, die ich schon habe.
Und ja, somit kann ich Punkt 4 meiner "make 9"-Challenge abhaken. Sehr schön! Die besagten Kleidungsstücke sind ein schwarzes Top und ein geblümter Rock. Das Oberteil habe ich schon, seit ich ein Teenager war. Der Rock ist recht neu, beide passen mir aber gut. Deshalb habe ich sie ausgewählt, um daraus etwas Neues zu machen.
 |
| Top und Rock. Nicht von den Socken ablenken lassen! |
Schnittmuster zeichnen
Um das Schnittmuster für das Oberteil zu erhalten, habe ich das Top möglichst flach auf dem Schnittmusterpapier ausgelegt und die wichtigsten Eckpunkte eingezeichnet. Wo möglich, bin ich einfach der Silhouette nachgefahren. Wo ich das nicht konnte, z.B. bei den Armlöchern des Rückenteils, habe ich den Finger an die Stelle gehalten, wo der Stoff endet und das Oberteil mehrere Mal immer wieder zurückgeklappt, damit ich dort eine Markierung setzen konnte. Die einzelnen Punkte habe ich dann verbunden.


Den Stoff zuschneiden
Für die Oberteile und die vordere Rockhälfte habe ich den Stoff gefaltet und an der Faltkante (Stoffbruch, mais oui) zugeschnitten. Die hintere Rockhälfte besteht hingegen aus zwei Einzelteilen.

 |
| Schwarzen Stoff auf schwarzem Teppich zuschneiden - nicht ideal zum Fotografieren! |
Zusammennähen
Ich habe Bügelvlies auf die Stellen gebügelt, wo die Schulternähte hinkommen, damit sie sich nicht mit der Zeit verziehen. Ob das bei so dickem Stoff nötig ist? Keine Ahnung, aber schaden tut's bestimmt nicht...


Ansonsten war das Zusammennähen recht simpel: Schultern und Seiten zusammennähen, Rockteile zusammennähen, und dann Rock und Oberteil zusammennähen.


Ausserdem entschied ich mich spontan, noch Taschen einzunähen. Darauf gehe ich aber jetzt nicht näher ein. (ausser ihr möchtet, dass ich das mal erkläre?) Stattdessen zeige ich hier, wie ich die Hals- und Armabschlüsse genäht habe:
Hals- und Armöffnungen
Zuerst mass ich ab, wie gross die Hals- bzw. Armöffnungen sind. Dann schnitt ich Bänder in der entsprechenden Länge und mit 4 cm Höhe zu. Ich faltete die Ränder zur Mitte und bügelte die Bänder (ähnlich wie Schrägbänder, aber mit geradem Maschenlauf). Dann nähte ich die Enden zusammen, so dass Ringe entstanden. Ausserdem waren die Bänder dadurch auch je 2 cm weniger lang als die Öffnungen, wo sie hinsollten.


Danach steckte ich die Bänder an die Öffnungen und nähte sie 1 cm vom Rand entfernt an der Aussenseite fest. Ich faltete dann die Bänder über die Nahtzugabe nach innen.


Hello my dears
I hope you all made it through winter alright. Although, it's not completely over yet. So I've made myself a dress from heavy jersey which goes well with turtlenecks. I've derived the pattern from pieces of clothes I already own. And yes, that means I can tick off point no. 4 from my "make 9" challenge list. Off to a good start! The clothes in question were a black top and a flower skirt. I have had this top since I was a teenager. The skirt is newer, but both fit me well. That's why I wanted to combine them into a new garment.
Drawing the pattern
To get the pattern for the upper part I laid out the top onto the paper and marked the shoulder and armholes. For the most part I could just trace the outline. But for some parts, like the armholes at the back, I had to hold my finger to where the outline was and then fold the tank top over to mark the place. I had to go back and forth to draw the shape and finally link all the markings. This worked relatively well, but in the end I had to find a middle ground between what had come out for the left and right half, and reassure myself with some more measuring and... educated guesses. I also had to make this part shorter than the original tank top: It was supposed to end at my waist, since that's where the skirt would be sewn on.
The skirt pattern was much easier. The main goal was to keep that beautiful flare. But as a change I made the dress skirt longer. I also had to slightly adjust the width of the waist, so the skirt and top would match.
Cutting the fabric
I folded the fabric for the upper parts and the front part of the skirt and aligned the patterns with the fold so as to get mirrored pieces. The back part of the skirt on the other hand is made out of two separate pieces.
Sewing
I ironed two strips of interfacing on where the shoulder seams are so they won't go out of shape over time. I have no idea if this is even necessairy with this heavy jersey, but I guess it will do no harm...
The sewing itself was rather simple: Sewing together the shoulder and side parts, then the different skirt parts and finally sewing upper and lower part together. I then spontaneously decided that I needed some pockets and undid some of the seams to get them in. But I won't get into details how to sew pockets (unless of course you'd like me to!). Instead, I'd like to show you how I finished the neck and armhole parts:
Neck and armholes
I measured the lenght of the neckline and armholes. Then I cut strips of fabric with 4 cm height and the respective lenght. I folded the edges toward the middle and ironed the strips (similar to bias tape, but with a straight grain). Then I sewed the ends together, making the strips into circles and also making them two centimetres shorter than the places they where made for.
I pinned the strips to their respective openings and sewed them onto the outside of the dress (1 cm from the edge). Then I folded the strips over the edges. Finally I topstitched the hems with a twin needle. I think this kind of finish looks very neat. BTW I've copied it from the original tank top.
Keine Kommentare:
Kommentar veröffentlichen