Ihr Lieben
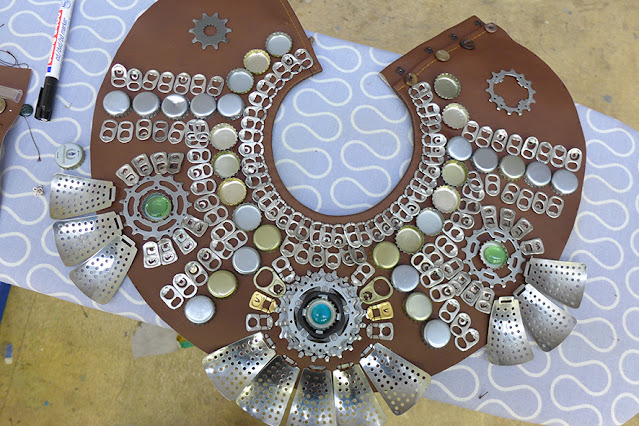
Willkommen zu Teil 2 meines postapokalyptisch-ägyptischen Cosplays! Angefangen hatte ich ja mit einem Kopfschmuck. Daneben brauchte ich aber auch einen Kragen. Hier arbeitete ich vor allem mit gebrauchten Materialien: Die Zahnkränze konnte ich bei einem Velomechaniker holen, das Sieb fand ich im Brockenhaus und was die vielen Dosenlaschen und Kronkorken angeht: Da hatte ich Hilfe von Freunden und Verwandten! Danke an dieser Stelle!
Die "Unterlage" besteht aus Kunstleder. Auch dieses musste ich nicht extra neu kaufen, da es schon lange herumlag. Es handelt sich um Resten eines Rucksacks, den ich früher einmal genäht hatte.
Der Kragen hat ungefähr die Form eines 3/4-Kreises mit einem Loch in der Mitte für den Kopf. Ich verstürzte den oberen Teil am Anfang mit etwas dickem Baumwollstoff (braun), ursprünglich nur, um einen sauberen Abschluss zu haben. Als ich dann aber mit dem Aufnähen der Einzelteile begann, merkte ich, dass der Stoff den Kragen auch stabiler machte. Darum bügelte ich nachträglich noch mehr Stoff (beige) auf die Rückseite des Kunstleders. Nun war der ganze Kragen innen mit Stoff verstärkt, stabiler, einfacher zu besticken und auch angenehmer zu tragen.
 |
| Besatz für den oberen Rand |
 |
| Der abgesteppte Besatz |
 |
| Damit der restliche Kragen innen ebenfalls Stoff hatte, bügelte ich Bügelvlies auf einen zweiten Stoff... |
 |
| ...und bügelte diesen Stoff dann an die Krageninnenseite. |
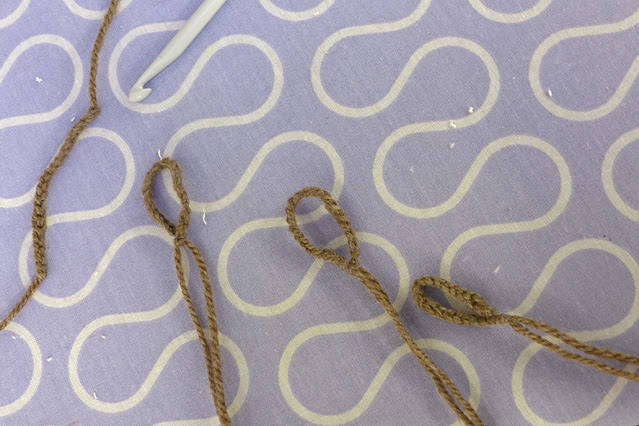
Der Kragen wird am Rücken geschlossen. Ich bereitete Schlaufen aus Wolle vor und nähte verschiedene Knöpfe an, die ich herumliegen hatte. Schlussendlich sind diese aber nur zur Verzierung: Ich fand, dass das Schliessen mit normalen Knöpfen zu fummelig ist und nähte kurzerhand Druckknöpfe an die Unterseite...
Danach kam der schwierigste Teil: Entscheiden, wie genau ich den Kragen verzieren wollte. Dazu legte ich die Einzelteile in verschiedenen Anordnungen aus, und das immer wieder, auch nachdem ich schon etwa die Hälfte festgenäht hatte. Ich war wirklich unentschlossen: Wollte ich lieber mehr oder weniger? Kreis- oder Linienförmige Muster? Bunt oder monochrom? Ich bin immer noch nicht überzeugt, ob die Variante, die ich am Ende gewählt habe, die Bestmögliche ist.
 |
| Auslegeversuch |
 |
| Weitere Variante |
 |
| Weitere Variante |
Das Befestigen selber dauerte zwar lange, war aber einfacher, als ich gedacht hätte. Fast alles, was ich zum Verzieren verwendete, hatte irgendwo Löcher, so dass ich es gut mit starkem Faden annähen konnte. Nur die Kronkorken musste ich anleimen. Dazu verwendete ich einen Leim, der speziell für Leder gedacht war. In den Versuchen hielt der eindeutig am besten. Hoffen wir, dass die Einzelteile auch im Praxiseinsatz kleben bleiben! Die Radteile leimte ich erst an, bevor ich sie zur Sicherheit auch noch festnähte.
 |
| Einzelteile annähen |
Damit habe ich also ein weiteres Element meines Cosplays. Trotzdem bleibt noch viel zu tun und obwohl ich Ideen und Pläne habe, der Gesamtlook ist für mich immer noch nicht ganz greifbar. Ich brauche sicher ein Kleid und wohl auch einen Gürtel, den ich ähnlich machen möchte wie den Kragen. Mal schauen, wie's weiter geht!
Wie immer alles Gute
Eta Carina
Hello my dears
Welcome to part 2 of my postapocalegyptian cosplay! Yes, that's a word silly me just invented. I had started this cosplay with a headdress.
Next I needed a collar. Here I mainly worked with used materials: I got the sprockets from a bike mechanic, the sieve was from a thrift store and for the many crown caps and can taps I had a lot of help from friends and family. Thank you so much!
The "base" is imitation leather. I didn't have to buy this one either as I had some left from a backpack I made some time ago. The collar is about the shape of a three-quarter circle with a hole in the middle for the head. I lined the upper part with a sturdy cotton fabric (brown). Initially I only did this to get a neat edge. But once I started sewing on the can taps I realized the cotton layer made the faux leather stabler and easier to work with. That's why I ironed on a bigger piece of fabric (beige) to the back side of the leather. Now the whole collar was lined, which surely made both stitching and wearing it more comfortable.
The collar is buttoned at the back. I prepared loops out of wool and sewed on different buttons I had laying around. But really they are just for decoration: I found closing them very fiddly so I decided to add some push buttons underneath...
Sewing it all on took quite some time but it was still easier than I had imagined. Nearly every piece I had to attach had some sort of hole, so it was easy to sew them on with a strong thread. The only exeption where the crown caps, which I had to glue on. I used a special glue for leather. I tested different glues and this turned out to be the strongest. Let's hope it stays that way even at the convention! I also used glue on the sprockets before I sewed them on, just to be sure.
The collar is buttoned at the back. I prepared loops out of wool and sewed on different buttons I had laying around. But really they are just for decoration: I found closing them very fiddly so I decided to add some push buttons underneath...
Then it was time for the trickiest part: Deciding in what pattern exactly I wanted to sew on all the different parts. I laid them out in different variations over and over again, even after I had already settled for a pattern. I was really not sure: Was less more? Did I prefer circles or lines? Should it be colourful or monochromatic? I'm still not convinced the version I made is the best possible.
So that's another part of this costume finished. But there's still a lot to do. And although I have ideas and plans how to proceed I still don't have a clear image of the overall look. Surely I'll need a dress and a belt next, which should match the collar. So let's see where that leads me.
As always: all the best
Eta Carina


Keine Kommentare:
Kommentar veröffentlichen